Showing posts with label color. Show all posts

Tuesday, February 2, 2016

Microscopic Color Deconstructed

So let us talk today about how I went from these inspiration pictures by Fabian Oefner

To a finished Art Quilt that looks like this.
It started with a bit of tracing the original and then adding in my own squiggles and circles to make it larger.  There are TWO layers of Pellon Soft and Crafty cotton batting between the top and backing.


White (washed) Kona Cotton.  I knew that I was going to be adding my color after, so the fabric had to be clean.
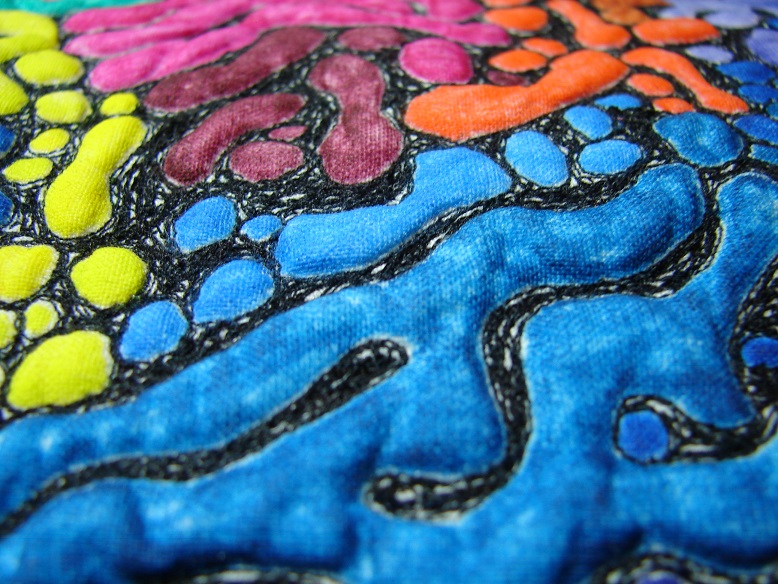
And then I started stitching.  And stitching.  And stitching.  The more I stitched, the more I found that I needed to add.  I had originally toyed with outlining everything, and actually coloring the black in between, but as you can see I ended up thread painting it instead.
I like the thread better.  The little peeks of white through, kind of like light. Also, then you don't see the crossover stitches.  Can you imagine tying off each end.  (insert maniacal laughter here)
Once everything was stitched, or as much as I wanted to go, I roughly basted an outside line and zig- zagged the edges and threw it in the wash.  I prayed.  I knew what I wanted it to do.
And it did!  After I got it flat again - the squiggles and circles were poofier than the thread areas.
Then I started adding color.  I used Delta Textile medium - using a generic paint brush to wet a squiggle, then I used Derwent Inktense Pencils to color in the wet area.  I asked for and received the color ink pencils for Christmas - I now want ALL the colors.  It is sooooo much fun.  There are so many more techniques I'd like to try. (all the pictures here are at night, so yellow, so sorry)
So I kept adding color.
An attempt at showing the texture of the quilt.  I found as I painted on the textile medium, it often made the fabric poof up just a bit more.  Ecstatic!

I just kept adding colors.

I think I did it over 3 or 4 days.

Then I trimmed it up and added a black binding.
I had to go back in and fill in some more thread.  It was necessary, and also frustrating. 
Also, because of the intense amount of thread, it was really hard to hand sew the binding down.  If I do something like this again, I will finish it differently.
So now you know how I put it together.  I do absolutely love it.  The painted areas are a bit stiff at this point.  The pencils are washable, although I can't see a reason to wash this again.  And as I mentioned before, there are a bazillion techniques out there to try - even just different mediums, like aloe vera gel!


I did get the label on, and even prepped labels for the rest of the year.  Yay me!

Monday, February 1, 2016

Four-In-Art Reveal Q1: Microscopic:Color


 Its a new year for our Four-In-Art group for making art quilts.  We've changed up the group a bit and relaxed the size rules and this year the overall theme is Color.
 When I heard the first quarter's theme was microscopic I started searching on the internet. (what did we do without Google?)
And I came across these amazing images by Fabian Oefner.  You can find an interesting interview on *this website* and his own website is www.fabianoefner.com.  The technique he uses is watercolors and something called a ferrofluid.  I highly recommend you go read about it.  There are more images as well. And yes, I even got permission to use the images as inspiration.

And so I give you my inspiration quilt:

Microscopic Color

 This is essentially a whole cloth quilt: quilted then painted with Inktense Pencils.
 A few close up shots.

 It ended up about 13"x10".  The thread painting/drawing is all Black Aurifil Thread.  Two layers of Pellon Soft and Crafty cotton batting.  The fabric is Kona White. The binding is Kona Black.
 The very boring back - and yes, as I write this no label either.  Tomorrow, I promise.  I will also give a detailed description of how I put this little quilt together.  Until then, check out all the other Four-In-Art members and their quilts!

Betty Ayershttps://www.flickr.com/photos/toot2
Camilla Cathrohttp://faffling.blogspot.co.nz/
Catherine Chisholmhttp://www.knottedcotton.com
Elizabeth Eastmondhttp://www.opquilt.com
Janine Greenhttp://www.rainbowhare.com
Nancy Myershttp://www.patchworkbreeze.blogspot.com
Rachel RileyMe!
Simone Bradfordhttp://quiltalicious.blogspot.com
Susan Snookshttp://patchworknplay.blogspot.com

You can also stop by our group blog http://fourinart.blogspot.com/

Tuesday, January 26, 2016

Talking about Color: Brown as a Neutral

Yesterday with the reveal of my latest quilt, I mentioned that I made it as part of a class on color.  Color is amazing, right?  As quilters, we love color.  We all tend to have a favorite color and a least favorite color.  I don't know about you, but I tend towards the blues.

 One of the things we talked about in the class were neutrals.  White, Black, Grey and Brown.  Yes, brown.  I have to admit, I've never really thought of brown as a neutral, always as a color.  But did you notice its not on the color wheel! 
White, black and grey are!  White is to make tints, black is to make tones, and grey is to make shades. 
 So with all these lovely arrays of colors, how does one get brown?  By mixing the colors together!
 If you take three colors in a triad, mix them equal strength, 1/3 each, you will get brown.  What happens if they aren't equal?  That is where chocolate comes in handy.  See, when fabric shopping, you always need some chocolate in your purse!
 Dark chocolate on the left, milk on the right, and when compared to the fabric, doesn't the fabric look orange or red?
 How about this one?  Maybe a little yellow in it?  Chocolate is a pure brown.
 This one looks pretty close to brown to me on the screen, but in real life, it was actually a bit green.
 Now this looks like a true brown. 

 I don't claim to be any kind of expert on color, but I found this to be really fascinating, and thought I'd share what I learned.