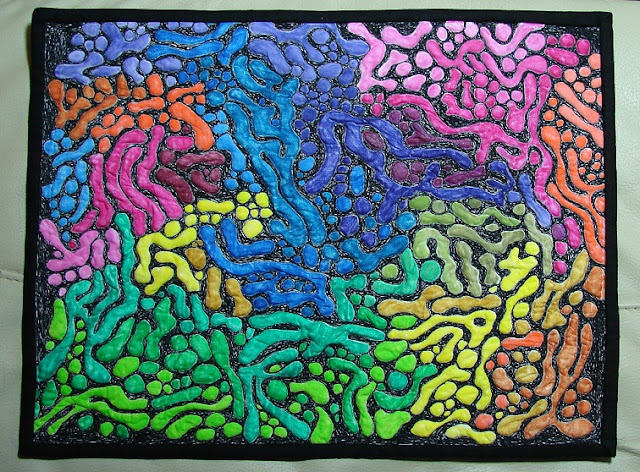
To a finished Art Quilt that looks like this.
It started with a bit of tracing the original and then adding in my own squiggles and circles to make it larger. There are TWO layers of Pellon Soft and Crafty cotton batting between the top and backing.
White (washed) Kona Cotton. I knew that I was going to be adding my color after, so the fabric had to be clean.
And then I started stitching. And stitching. And stitching. The more I stitched, the more I found that I needed to add. I had originally toyed with outlining everything, and actually coloring the black in between, but as you can see I ended up thread painting it instead.
I like the thread better. The little peeks of white through, kind of like light. Also, then you don't see the crossover stitches. Can you imagine tying off each end. (insert maniacal laughter here)
And it did! After I got it flat again - the squiggles and circles were poofier than the thread areas.
Then I started adding color. I used Delta Textile medium - using a generic paint brush to wet a squiggle, then I used Derwent Inktense Pencils to color in the wet area. I asked for and received the color ink pencils for Christmas - I now want ALL the colors. It is sooooo much fun. There are so many more techniques I'd like to try. (all the pictures here are at night, so yellow, so sorry)
So I kept adding color.
An attempt at showing the texture of the quilt. I found as I painted on the textile medium, it often made the fabric poof up just a bit more. Ecstatic!
I just kept adding colors.
I think I did it over 3 or 4 days.
Then I trimmed it up and added a black binding.
I had to go back in and fill in some more thread. It was necessary, and also frustrating.
Also, because of the intense amount of thread, it was really hard to hand sew the binding down. If I do something like this again, I will finish it differently.
So now you know how I put it together. I do absolutely love it. The painted areas are a bit stiff at this point. The pencils are washable, although I can't see a reason to wash this again. And as I mentioned before, there are a bazillion techniques out there to try - even just different mediums, like aloe vera gel!
I did get the label on, and even prepped labels for the rest of the year. Yay me!


4 comments:
I'm even more in awe now. I bet some of it was a lot of fun to do, but some of it (the stippling!) must have felt like it was going to go on forever. The coloured puffiness is such a great result.
Wow...that is amazing. I loved reading how you accomplished the end result. It is beautiful.
Amazing! Thanks for sharing your process!
WOW!!!! When I saw the first image I had no idea you had stitched all the black and colored the other areas. Ingenious approach to a fun concept. I also like the bits of white in the stitched area. Can see how it would have been hard to bind.
Post a Comment