Showing posts with label Ruby Hexagon quilt. Show all posts

Friday, May 18, 2012

Blogger's Quilt Festival Entry

I couldn't decide which quilt I've finished recently that I wanted to enter in the Blogger's Quilt Festival.  I thought that the Windows Quilt might be visually stunning, but I've decided on the Ruby Hexagon Quilt, instead.
 As part of the entry, I'm supposed to talk about why I made it, why its special, and what I learned.
 I made this quilt for a friend who was expecting her fourth child:  a girl after having three boys!
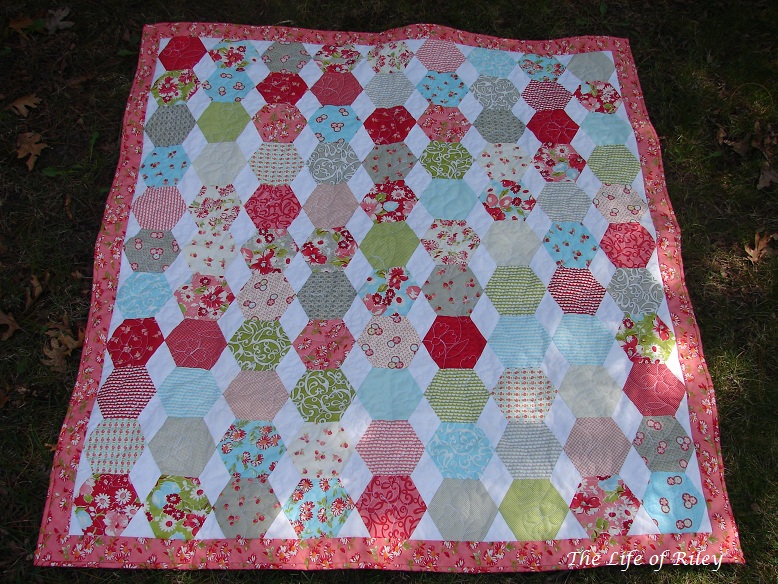
 She chose a hexagon and diamond pattern and the Ruby line from Moda.  I made it happen.  I did all the math myself! Oy.  But it worked out!  The hexagons were machine pieced into chains and then I hand pieced the diamonds in.
Why do I love this quilt - it is a demonstration of all my quilting skills - including things that I never thought I'd try before.  I really enjoyed the hand piecing parts of the quilt and am thrilled with how much precision you can get!  This quilt has a lot of inset seams!

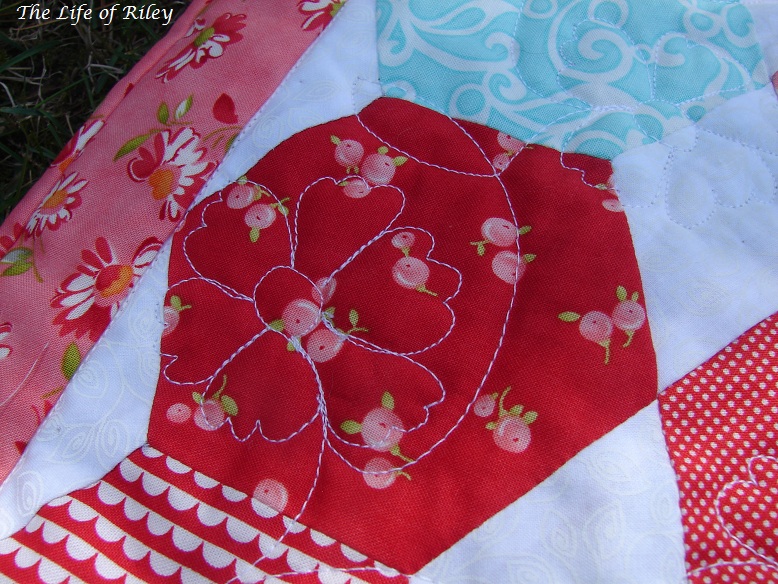
The backing is flannel and so soft, perfect for a baby girl!  I free motion quilted flowers and leaves with my domestic machine.  A pattern that I made up myself.  The hexagon on the back is the label - we were still waiting for the arrival when I was taking photos of the quilt.
 What did I learn?  Well, I learned how to hand piece, and I think I was pretty skilled at it by the end of the quilt!  Perhaps it was the hand piecing that reinforced the idea that sometimes you have to slow down and take the time to get things right.
 After all the work I put it in, it was definitely one of the hardest quilts to give away - but it couldn't have gone to a better home!

 
Amy's Creative Side


Friday, April 20, 2012

How I Made The Ruby Quilt - Quilting & Finishing

I decided the quilt definitely needed borders.  Most of my quilts get borders.  I think it helps to frame the piece.  I also heavily pin basted before quilting.  Flannel has a tendency to stretch, and I didn't want puckers!
 For this piece I did some sketches for the quilting.  I decided simpler was better (and easier).
 A test of the stitches on a layered swatch.
 The thing is, you can't see the quilting on the back at all.  This could be a good thing :). 
 And really, it's hard to see it on the front as well, unless it is in a high contrast spot like these:

I guess it's a good reminder that a busy pieced quilt doesn't need fancy quilting.  I still love the flowers, though.

Then I just put the binding on - same fabric as the border - and held the quilt hostage until I could see the baby!  (I was really just waiting for the birth so I could put her name on the label.)


Thursday, April 19, 2012

How I Made The Ruby Quilt - Diamonds & Triangles

 Today we'll talk about the diamonds.  Once again I printed them out via Incompetech.  Sized to fit the hexagons makes the long side 2.75" and the width 2 3/8".  The diamonds are pretty easy to rotary cut from strips. 
*I forgot to mention this about the Hexes: Starch is your friend!  Two sides will be on grain - the other two will be on the bias.  You really don't want these to stretch!  Use your favorite method, but starch is important!
 Once again you need to mark where the seams meet.  Later I went back and drew in the actual seam lines so it was easier to follow as I hand pieced.
 100 or so diamonds ready to go.
 Piecing them into the hexes.  You have to start and stop at the marked points, so there is room to maneuver the set-in seams.  I used a simple running stitch to piece.  By the end of piecing I had some pretty tiny stitches!

The triangles is where my instructions bog down a bit.  I could not for the life of me get the measurements right.  So I opted for a larger triangle so I could cut it down later.  So it is a 60 degree triangle, 3" on a side.  You can see how they are a bit longer than the hexes.

So once all the pieces were pieced.  I had a top!  Waiting for borders.  It took about two weeks of hand piecing.  Lots of movies, violin lessons, and ballet lessons.
 Tomorrow: Quilting the quilt.

Tuesday, April 17, 2012

How I made the Ruby Quilt - Hexagons

I know you've seen a lot of WIPS while I worked on the Ruby Hex Quilt, but I thought I'd give you some background and show you how I did some things.

First: Never have your non quilting friends pick out a quilt pattern!  Kidding. Sort of.  I ordered the pattern that my friend liked - and I hated it.  Actually, I hated the instructions.  The finished product would have looked pretty much the same, but the pattern had been designed for easier piecing.  That meant lots more seams - and the hexes didn't end up quite even.  So I figured out the sizing from scratch.

First, starch is important in this project.  Whatever your favorite method is, use it.  The Hexes will be on grain on two sides, leaving FOUR sides on the bias.  You really don't want these pieces to stretch.

 Incompetech is my friend.  You can print out graph paper in almost any size and shape you want.  Since I wanted to use the most of a 5" charm square - I figured out a hexagon that was 5" across.  That makes each side 2.5".


 I used basting spray on the paper so it would stick to the charm squares while I cut.


 You have to mark your seam intersections.  This is VERY important.  DO NOT SKIP this.

Now the hexagons are ready to piece.  First I laid them out in the way I liked.  I don't have a design wall.  I used a flannel sheet on the living room floor.
 I staked them up in order and labeled the rows.
And pieced them into strips.  Starting and stopping at the marked dots.  I also back stitched so they wouldn't pull apart.

And now this post is long enough.  I'll talk diamonds tomorrow.


Monday, April 16, 2012

The Ruby Hexagon Quilt

The quilt is finished and delivered!  Welcome baby Lucy!

 99 Hexes.  33 fabrics - 3 of each in the quilt top.  80 diamonds.  20 half diamonds.  8 triangles and 4 half triangles.  The hexagon fabric is from  the Ruby line by Bonnie and Camille for Moda.  The white is a white on white leaf pattern.
 The hexes were pieced into rows by machine, the diamonds and triangles were pieced in by hand.  The border was done by machine.
 The back is a solid piece of flannel also from the Ruby line.  Soft as butter!
 I did some free motion quilting of flowers and leaves.

 A picture of the label which you can read about here.


Posts about how I put it together  Here.  Here.  & Here.
The quilt label post Here.

Finish it up Friday.

Tuesday, March 27, 2012

Applying a Quilt Label

I've been trying to incorporate my quilt labels into the backs of my quilts more, lately.  In my Jacob's Ladder quilt the label was pieced into the back.  I like that it makes the label more permanent, and also it isn't the last thing that has to be finished.  AND you don't have to hand sew it on to the back of the quilt!

 Today I'll show you how I did the label for my Ruby Hexagon Quilt.
First, decide what kind of label you want.  I decided to tie in the label with the hexagon pattern on the front.
 Fold and iron under 1/4" on all sides.
 Pin to your quilt backing.  I did a little rough measuring to make sure the label would end up on the back of the quilt and not off the edge!
 Sew down the folded side - close to the edge.  I also added an extra line of stitching around the inside hexagon, too.  You don't have to do that.  Now you can layer and baste your quilt top and back.
When you do your quilting your label will truly be a part of the quilt.

You may have noticed the label is blank....The baby is due next week.  I'll complete the label for gifting.