Fabric Basket Tutorial
Hi! You've seen the striped one *here* before, and above you can see the others I've been working on. These are all part of my Makes for Christmas. I only need 5 for teachers gifts, but they are really fun and easy to sew up.
Today I will show you how to make your very own, very cute, fabric basket.
I used the gingerbread men for the instructions:
Finished basket size is 4" x 5" at the base and 4" high.
Let's begin:
Supplies:
Main Fabric
Lining Fabric
Heavy Weight Fusible Interfacing
Thin batting, I used pellon cotton
Scissors/Rotary Cutter
Iron
Sewing machine
Thread
I used a walking foot and topstitch needle for all sewing and construction. I find it helps to move all those layers through the machine.
Cut your fabric into a rectangle at least 10 x 13. We will trim it up later.
Do the same for your interfacing, and iron it to the the wrong side of your fabric.
Cut out a piece of batting slightly larger than your fabric.
Quilt through the layers of fabric, interfacing and batting in any pattern you like. I didn't go crazy because the quilting really doesn't stand out against the busy print, but if you are making a solid colored basket, you could do some fancy stitch work. I also didn't baste, its such a small piece I found that it didn't really move around. If you are more comfortable with some pins, by all means, go ahead and pin the layers together.
Quilting from the backside.
Trim the quilted layers to 9.5" x 12.5"
Cut lining to 9.5" x 12.5"
Fold quilted piece right sides together, 9.5" sides across the top. Stitch sides with a 1/4" seam.
Do the same for the lining. Press the seams open.
Now to box the corners. 2" from the tip to the straight edge of the ruler. Draw a line across, this is your stitching line.
Box both corners, stitch across the drawn lines.
Trim.
Box the corners of the lining in the same way.
Handles:
Cut a strip of fabric 2" x at least 16"
Fold in half and iron to find the center.
Open up and fold the sides in to just barely meet the center.
Press and stitch along the open edge. Cut 2 handles to 8" long each.
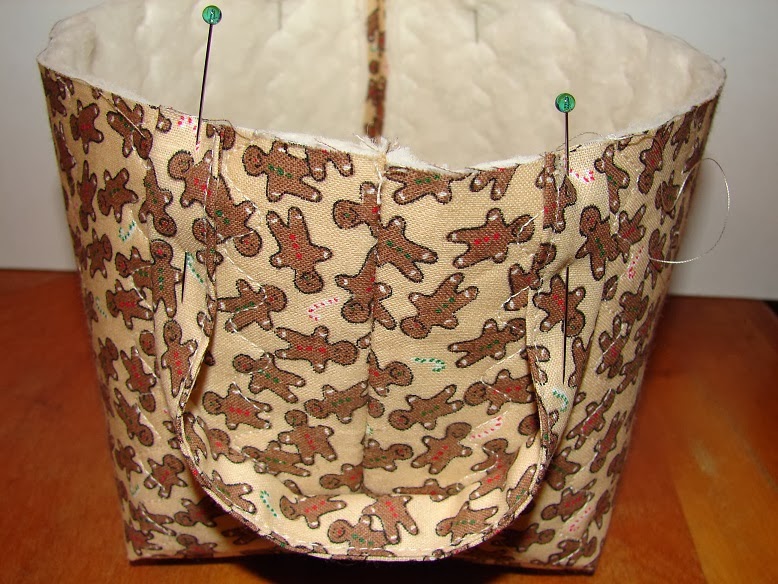
Pin inside of handle strip 1" away from center seam on outside of the basket. Repeat on the other side.
Baste. I baste all the way across, so that I can also baste open the center seam so it stays flat for later on.
Pin lining to quilted layers, right sides together.
Sew around the top leaving 2-3" open to turn.
I recommend having the lining on the inside and the layers on the outside. It seems to feed through the machine better this way. Tip #1: I place two pins where I want to stop and start so I don't forget to leave an opening. Tip #2: Back stitch at the start and end so you don't pull open your stitches when you turn the basket right side out.
Turn your basket right side out through the opening in the top.
Roll the lining to the inside and press well. Fold in lining and basket edge at opening and pin. Top
stitch around the top 1/8" from the edge. This will catch your opening so no hand stitching is necessary.
Press as needed for a finished basket, tack corners if desired.
Make a few.
Or a lot!
I think this one is my favorite.
Any questions? Leave a comment or email me and I'll try to help out.


8 comments:
Thank you for the tutorial, your baskets are so cute!
Nicely done! I received your basket last night. I love it! It's getting a cameo on my blog tomorrow. Thanks again!
Cool. I like the one that looks like knitted. What a fun fabric.
Wow! These are easy! ...I might just have to make a few. :) Thanks for the great tutorial!
These are lovely baskets and your tute is great! Thank you for sharing this :)
I've always wanted to make one of these, thanks for the tutorial!
-Julie
Really nice tutorial! Thanks for sharing.
Teri
Great! thanks, very handy tutorial.
Post a Comment