Showing posts with label Quilting. Show all posts

Tuesday, July 27, 2021

Duck Obsessions: Drake Lake Quilt

It started in early spring with WD. He started the infatuation with ducks. 

I came home one day and he had done all the research on raising ducks. 

So we decided to give it a go.
They are actually easier than chickens in quite a few ways. We started with 10 ducklings. Lost one to a hawk, and just put one in the freezer. We will keep 4-5 in total for eggs.
I will have to get updated pictures, because they are actually full grown and white now.
So, then, one day while I came across all the fabric, half pieced blocks and book for this quilt. I finished it and quilted it and just gave it to my duck obsessed boy.
I had to finish sewing the ducks together, they were already pieced. I then made all but two of the reed blocks. All with the bundle that had come together. 

I hope the woman who stated this is would be pleased to know it's done. 
Hard to tell, but this duck is made of sparkly fabric. Just fulfilling the vision....
I pieced a white duck for the back, since ours are white Pekins.

Tuesday, October 9, 2018

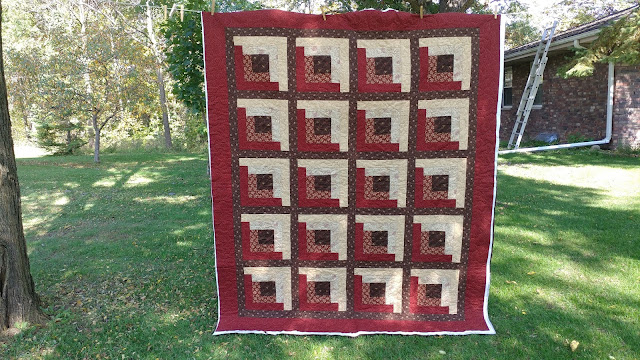
A Quilted Log Cabin - For a Friend

 It's been a rough summer.
Time has slipped away.
BUT, I am reclaiming the things that I love to do, and one of them is this blog.  So let us get to it!


This quilt top was NOT made by me.  I have been talking with the acquaintance who did make it for a couple of years about it.  She had made the top about 10 years ago when a friend of hers showed her quilting.  Then that friend moved away and the top sat.  (we all know this story)
I had offered to quilt it for her a while ago.  Recently, she decided to pull it out and see if she could do the quilting herself.  She got the back made, got it all basted, started some stitch in the ditch, and ended up with puckers.  Back into the closet it went.

I told her to bring it to me, stitches and everything.  She did actually take out the stitching, but I unbasted, re-ironed and re-basted the whole thing.  Proably using at least twice as many pins as her.

Trying out some thread choices.  She had included some coats and clark brown - but I wanted to do better for her than that.  It's not like I'm going to run out of thread anytime soon.
I went with the light brown aurifil.  It blended in perfectly with the neutral areas of the quilt and is fine enough to sink in to the areas where it does contrast.  A good wash will help with that, too.


 She really made a lovely back, too.

 The quilting is a large all over meander/stipple.  For some reason this comes pretty naturally to me.  It is also fast.  She had suggested stitch in the ditch, but that's easier said than done with log cabin.  Too many stops and starts.

The approximate size of this is 68" x 80".

I also now appreciate the quilting for others aspect.  I don't have to trim and bind.  My job here is done.
It is 83F here in Wisconsin today.  40 on Thursday.  Such a strange Autumn so far. 

Friday, April 15, 2016

Candy Boxes: A Queen Size Quilt Finish

This quilt has been a long time coming.
I mean a loooong time.
As in, I promised my niece a quilt and then promptly forgot about it.

 I also couldn't share much in the way of in progress pictures, because, you know, a gift, and the internet.  No surprises there...  So the above picture is me laying out blocks on my bed, trying to decide on a layout. Also freaking out about how much BROWN there seemed to be.
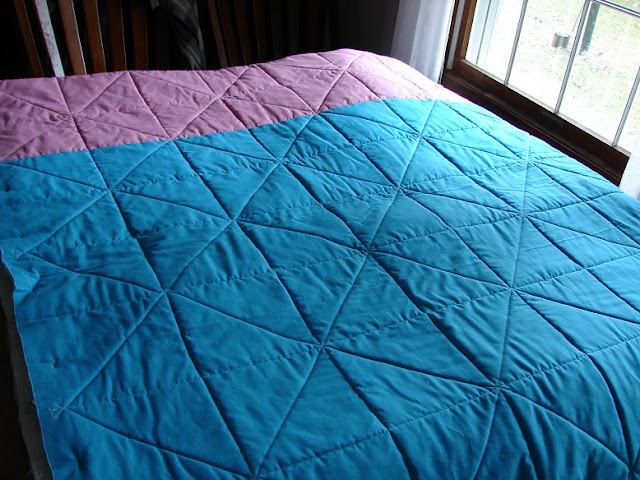
 The above shot was after I had done all the straight line quilting.  For this quilt I actually kept track of quilting time.  You see, I always underestimate quilting time.  Always. So since I was working on a single project, I kept track.  Straight line quilting alone: 376 minutes (6.2 hours)
 So on to the finished quilt, and lots of pictures.  But none of a full shot.  It is really hard for me to photograph a queen size quilt by myself.  In fact, it turned out to be impossible.
 First I tried to put it on the swing set.  Not working.
 So I ended up using the laundry line.  If you take the upper and attach it to the lower picture, you'll have the whole thing! :)
 After the straight line quilting was done, I went back in for some free motion quilting.
 It added lots of texture, and I was trying to tone down the brown some.
 I did the pink first.  Quilting time: 288 minutes (4.8 hours)


 Then on to the blue.  222 minutes (3.7 hours)  Not sure why the blue was less, except that perhaps I was getting into the rhythm of it.  It is the same amount of blocks for the blue.

 Pretty much my favorite shot.  The Kona Solids backing really shows off the quilting.  Totally a double sided quilt!
 So it was called EARQ for a long time here and on IG for my niece's initials plus Quilt.  Mr. Riley said one day that it looked like boxes of candy, so that's what I went for in a name.
 A few more details:

The pattern is a snowballed pinwheel which is inspired by a Missouri Star Block Magazine pattern, theirs used 5" blocks, but I blew it up to 10" blocks.

Fabrics are Kona Cottons, a Makower UK print stripe and a Brother Sister Design print.

Batting is TWO layers of Pellon soft and crafty.  That stuff is really thin, and I wanted this quilt to be warm and textured.

Thread is all Aurifil.  Pieced in neutral 40 wt. Quilted in White 40 wt., Blue and Pink 50 wt. 

Size is 81" x 94"  Queen.  (I can't remember the last time I made (finished) a large quilt like this.

Total quilting time: 886 minutes (14.76 hours)  That doesn't include any other parts of quilt making, pure quilting time, only.

I do have some left over fabric, along with some bonus blocks that I'll talk about in a future post.
 

Monday, February 28, 2011

Quilt #4 - Embrace the Mistakes


This is the 'big brother' to my other mini - 1" quilt.  This one had been in my head since I heard of the auction that it will be in. I'm fairly happy with how it turned out.

However, this is what it looked like Saturday afternoon. 
 I was not happy.  I couldn't get it to square up.  This is my own fault.  I did not follow my own advice from the tutorial about switching sewing directions when sewing the strips, and therefore, the whole thing was skewed.  The cream border only highlighted the fact that it wasn't square.  So I decided to emphasize the 'crookedness' and thus it is actually less noticeable. (Or at least that's what I tell myself!)

Of course, this involved taking apart a 'finished' quilt,  (I even had the sleeve sewn down), and re-doing it.  I added large black borders, more batting and more backing around the edges.
 Then I eyed up my new square.
 And cut.
 Finished and bound.  And measuring a nice square 12" x 12".


 This is the back.  A lovely Toile.  (I do love toile!)  Simple quilting.  It hardly needs any since it is so small. 


This quilt actually has a purpose.  HOPESCenter is having an auction of Coffee and Tea themed quilts.  The directions were to make a 12" x 12" quilt with the theme, the colors or the fabric from countries that make tea & coffee.  I hope my colors count.  I've got everything from black coffee to green tea!  If you are local, bidding for the quilts will be between April 1 & Oct 1.  I will have to go check out everyone else's.

Oh, and it needs a name!  Any suggestions?

Friday, February 11, 2011

Fusible Grid Quilting Tutorial


 The mini quilt is finished.  It's big brother is half way there, but I'm ready to show you how I did it, and how you can, too!

Now, this is a long post with lots of pictures, so if you want to stop reading now, I totally understand.  Otherwise, continue on.

 
The fabric: Top: Kona Cotton 1999 (joanns?)
Bali Circles - Keepsake Quilting
Brown Leaf Batik - Hobby Lobby
Orange swirls Bali - Keepsake Quilting
Purple Bali - Keepsake Quilting


 Cut out lots of 1" squares.  The mini version is 13 x 13 = 169 squares.

 Now get yourself some Grided Fusible Interfacing!  This piece is from a place called Quiltsmart.  They sell by the panel, and have multiple sizes.  You can get some by Pellon at your regular fabric store - cheaper, but only 1" size.  Pellon does however make a version that is 'on point'.  I will be using that in a future quilt.


 You will need to put your interfacing on something that can be ironed on.  Once you get those squares down, you don't want to be moving things around.  I used a double folded towel on my table.

 Start placing those squares in your desired pattern.
 Keep going!  At this point it doesn't have to be perfect.
 Phew, that's a lot of squares.
I use a Clover Mini Iron to iron my squares in place.  You could use your regular iron, just be super careful of your fingers, and not moving those squares!
 I start in the upper left corner of the piece.  Align the fabric square with the bottom and right sides of the grid.
 Lightly iron in place.
 Continue on.  The squares will probably over lap just a bit, like scales.  Unless you cut perfectly.  I didn't.
 Work your way down and across, ironing in place.  Stand back once in a while to make sure you are staying true to your pattern.  You can peel them off if necessary, but it's best to not have to.
 All ironed down.
 Now you are ready to start sewing.

Pick a side to start on.  Fold along the first grid line - right sides together.  I like to pin.  Pins give me a feeling of control.  If you want to fold and sew along the way, go for it.  It would probably be faster!  Sew a 1/4" seam.  Consistency is the key here.  A perfect 1/4" seam isn't crucial, as long as all your seams are the same size.  The most important thing here is straight lines.

Continue folding and sewing until you have all the seams done in one direction.  I would recommend alternating which side is 'top'.  When we sew, there is a tendency to 'pull' in one direction.  If you do that over may strips, you will end up with a crooked piece.  Alternating directions can help keep things lined up.
 This is what the back side will look like.
 Here is the front side after I ironed it out.  Has a sort of bargello effect.

  This part is going to be tedious, but it will help eliminate bulk.  You need to snip at each intersection up to the sewn seam.

That way, when you start sewing the other direction, the seams will nest together.
This picture is of the bigger quilt.  I neglected to do this on the little one.  It makes a big difference.
 When you're done sewing all the seams it might look something like this.  Unless you were good and ironed after every one.
 Nice and ironed out.
What the back should look like (again, the bigger version)

From here on out, its like finishing any other quilt.
  A little squaring up.
 Cut out and apply some borders.  I was a little concerned about the borders not being interfaced, and the rest having it, but it worked out OK.
Layer your quilt sandwich, baste, quilt and bind.
Voila!
Everyone keeps telling me it's perfect for a hot pad/ trivet.  I am slightly offended by that - I mean come on, 169 pieces!  I don't want spaghetti sauce on it!

Edited: You can now see the other 1" quilt HERE.