A tote bag can make a quick, easy, useful and personalized gift. This special one went to my great niece who is a big fan of all things princess. A basic tote bag can be put together in an hour or less.
What you will need:
Fashion fabric (what everyone will see)
Lining fabric
Cutting tools (scissors or rotary cutter)
Thread
Fusible interfacing
Pins
Fabric marker or pencil
Iron
Start by cutting your outside fabric in a rectangle 29" x 17"
Cut the same for the lining.
Fold fabric in half, right sides together and sew along the side and bottom edges. I used a 1/2" seam allowance.
Do the same for the lining fabric.
Press open your seams as much as possible.
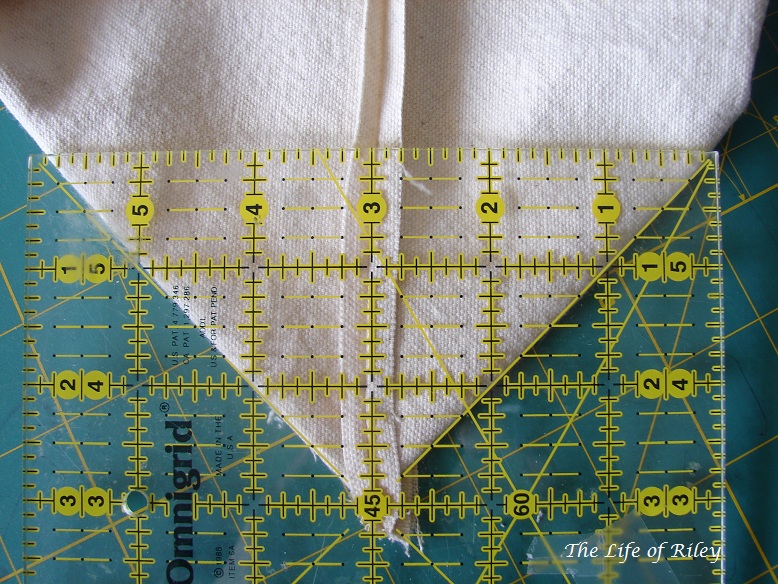
At the bottom of your bag you will make a 45 degree fold which places the seam in the middle. Right sides are still together. This makes a pleat, which forms the bottom of your bag.
Measure 1.5" from the center out to each edge and draw a line. You will be sewing along this line.
Draw your line and pin.
Sew across the drawn line and cut off extra fabric. Do this for each corner on the outside fabric and lining fabric.
Now cut two pieces of fabric for your handles. 22" x 3 ".
Cut two pieces of fusible interfacing 22" x 3"
Fuse interfacing to the wrong side of the fabric, following manufacturer's instructions.
Fold handle in half and press, creating a center line.
Open back up and fold in sides to meet in the middle. Press.
Now fold in half and press. You will have a handle that measures 3/4" wide.
Sew long open side of the handle, close to the edge - about 1/4".
Pin handles in place. Find the center of the bag and place them evenly apart. Mine are 4 inches apart.
Bast across the top of the handles.
Now you are going to pin your outside fabric to your lining, making sure they are right sides together. The handles will go between the fabric and lining.
Make sure you leave an opening for turning your bag right side out. I place two pins at the points I want to start and stop at, so I don't sew a complete circle and have to go back and pick out stitches. The opening here is about 3".
Sew all along the top of the bag, back-stitching at your starting and stopping points.
Turn your bag right sides out.
Push your lining to the inside and press.
You will have an opening where you turned the bag. You
could hand sew this closed, but since it's a quick tote, just pin it shut and it will get closed up on the next step.
Top stitch along the top of the bag about 1/4" from the edge.
One tote bag ready to go.
Once you have the basics down there are many ways to change it up. Bigger, smaller, wider straps, pockets. You can even make the pleats bigger for a wider bottom.
Filled up and ready to gift.


4 comments:
Love it. I'm sure it was a big hit!
Great tote and tute!! TFS!! Stopping by from Quilt Story linky party.
Here is what I shared this week: http://craftybrooklynarmywife.blogspot.ca/2012/03/vinyl-amp-cover.html
WOW! Thank you for this! I've been mulling the idea of a tote for taking to the library...I think I can DO this!!! Thank you!!!!
Thank you for such a clear and well photographed tutorial. The fabric you made it in is gorgeous.
Thanks again
Linda xx
Post a Comment